
Evolution Truck R/C Tutorials
Page 1 of 1

Evolution Truck R/C Tutorials
![]() Admin Mon Feb 04, 2008 7:07 pm
Admin Mon Feb 04, 2008 7:07 pm
Post your Xmods Evolution Truck R/C Tutorials here.

Admin- Admin
- Posts : 30
Join date : 2008-02-04 -

XMODS Truck Battery Relocation(Many Pictures)
![]() Admin Sat Feb 16, 2008 5:38 pm
Admin Sat Feb 16, 2008 5:38 pm
Hello Friends:
I have seen so many tutorials on how to perform a servo, Tamiya gearbox or other powerplant upgrade that I know the steps by heart. I wanted to bring you a tutorial that teahces you how to relocate your XMODS truck's battery pack to the top of the chasiss, or wherever else you may want to put it. This gives you a great gain in ground clearance as the pack takes up a lot of space. So, lets begin.
You will need the following tools/materials:
-XMODS Evolution Truck
-Soldering Iron
-Phillips Head Screwdriver
-Flat Head Screwdriver
-Wire (18 GA)
-Wire Cutters
-Solder
-Electrical Tape/Heatshrink Tubing
-Hobby Knife

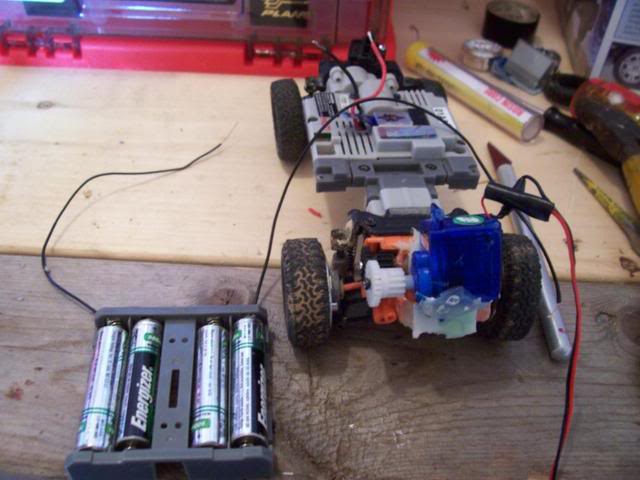
1.)The first step is to remove the battery pack. You will do this br removing the two screws located in the middle of the pack. (Like you were going to reposition the pack.
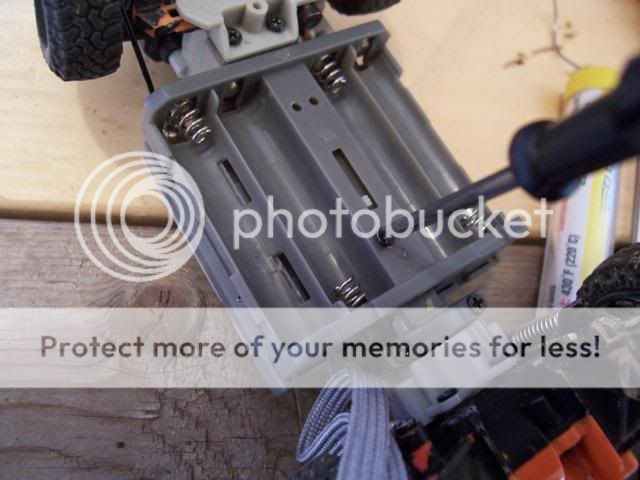
2.)Next, you will use the flat head screwdriver to gently pry the pack off its clips.
NOTE: The pack is still attatched,so be careful when reomoving it.
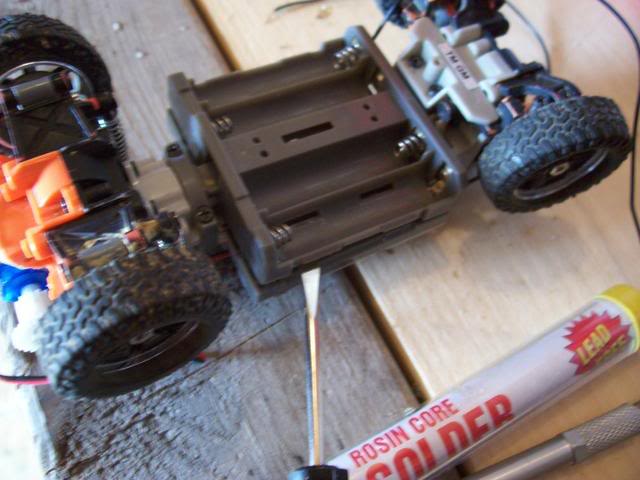
3.)Now, take your wire cutters and snip the wire in about the middle or end, as close as you can get to the battery pack.

4.)You have now succesfully removed the battery pack. You should have this:

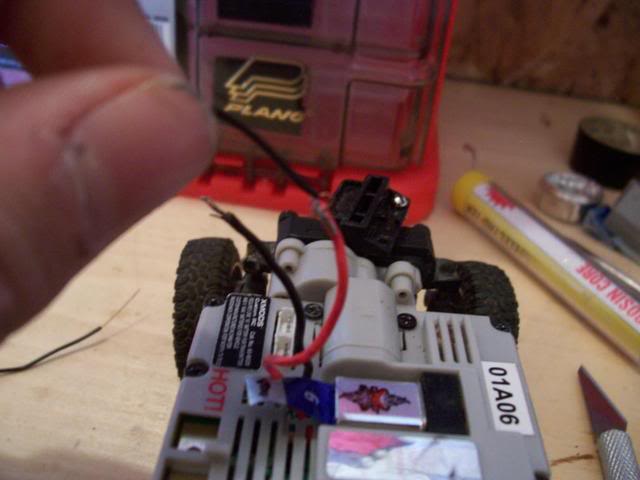
The next thing you must do is remove the board cover.

Be sure to remove the motor contacts, antenna, crystal, and other things inhibiting the removal of the cover.
5.)Now, you will have this: Remove the single screw on the board to access the wires.
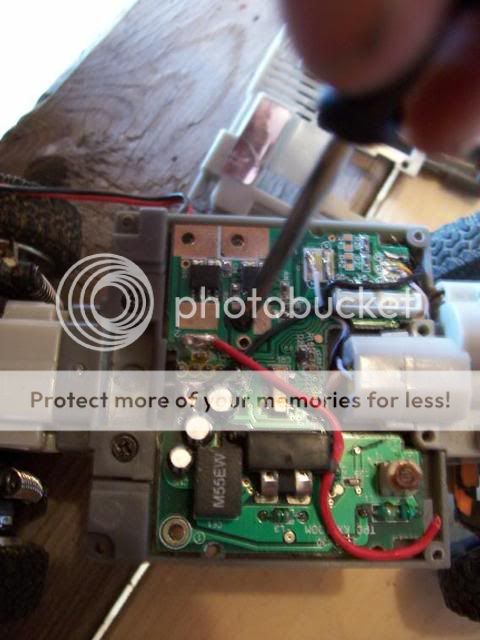
Carefully pull out the wires and replace the board in its original postion and replace the screw.
6.)Now, you will need to slightly modify the board cover. Simply cut out a square in these vents with your knife.

7.)Then, you will need to route the wires through the hole you just created. Do this carefully to prevent the wires from breaking.

8.)Now, replace the screws, crystal, motor contacts, antenna, and etc. Remeber to install every screw you removed.
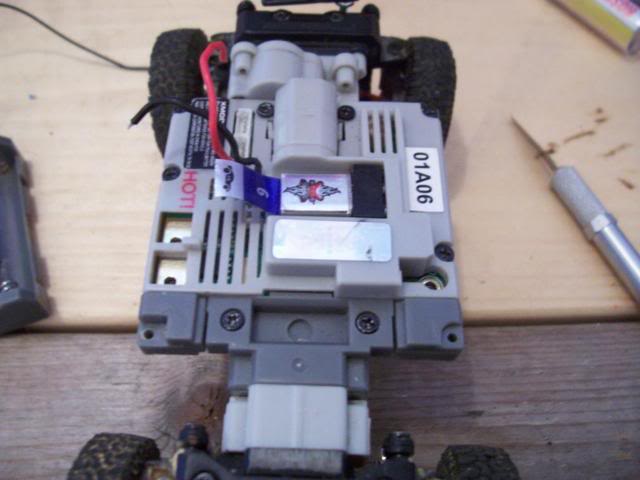
9.) Now, you will need to work on your battery pack. You will need to solder longer wires on to it, so you can place the pack wherever you desire. Make sure you have removed the batteries before completing this step!

10.)The nest thing you must do is join the wires. This can be a failure point, as you may incorrectly connect the wires. So, when connecting the wires, from this picture, with the XMODS back facing you, the red wire goes to the right side. I remembered it as RR.
To make your connections, strip the wire a bit to expose it. Now fold one wire around the other, fold, and then fold the other on top of it, to create something similar to a chain link.
Now, apply an appropriate ammount of solder.

11.) You must apply heatshrink tubing or electrical tape. This prevents shorts, and, exposed wires are never a good thing. Wrap the tape tightly or fully shrink the tubing.

12.) Now, you will have this:

I like to put the pack on top of the chasiss, but it works equally well if you put it in the bed, cab, or etc. It is your choice. I also bundle the wires with some electrical tape for a cleaner look.

The finished product:

Misc. Notes:Some people like to use differents packs, which is fine. Radioshack offers smaller packs in the electronics bin. Also, you can wire 2 packs (2 AAA each) in a pattern, to split the packs up in unused space on the truck. This is also a good time to add a six cell modification, while you are doing battery wiring work.
Thanks for looking,
Tyler Walker
I have seen so many tutorials on how to perform a servo, Tamiya gearbox or other powerplant upgrade that I know the steps by heart. I wanted to bring you a tutorial that teahces you how to relocate your XMODS truck's battery pack to the top of the chasiss, or wherever else you may want to put it. This gives you a great gain in ground clearance as the pack takes up a lot of space. So, lets begin.
You will need the following tools/materials:
-XMODS Evolution Truck
-Soldering Iron
-Phillips Head Screwdriver
-Flat Head Screwdriver
-Wire (18 GA)
-Wire Cutters
-Solder
-Electrical Tape/Heatshrink Tubing
-Hobby Knife
1.)The first step is to remove the battery pack. You will do this br removing the two screws located in the middle of the pack. (Like you were going to reposition the pack.
2.)Next, you will use the flat head screwdriver to gently pry the pack off its clips.
NOTE: The pack is still attatched,so be careful when reomoving it.
3.)Now, take your wire cutters and snip the wire in about the middle or end, as close as you can get to the battery pack.
4.)You have now succesfully removed the battery pack. You should have this:
The next thing you must do is remove the board cover.
Be sure to remove the motor contacts, antenna, crystal, and other things inhibiting the removal of the cover.
5.)Now, you will have this: Remove the single screw on the board to access the wires.
Carefully pull out the wires and replace the board in its original postion and replace the screw.
6.)Now, you will need to slightly modify the board cover. Simply cut out a square in these vents with your knife.
7.)Then, you will need to route the wires through the hole you just created. Do this carefully to prevent the wires from breaking.
8.)Now, replace the screws, crystal, motor contacts, antenna, and etc. Remeber to install every screw you removed.
9.) Now, you will need to work on your battery pack. You will need to solder longer wires on to it, so you can place the pack wherever you desire. Make sure you have removed the batteries before completing this step!
10.)The nest thing you must do is join the wires. This can be a failure point, as you may incorrectly connect the wires. So, when connecting the wires, from this picture, with the XMODS back facing you, the red wire goes to the right side. I remembered it as RR.
To make your connections, strip the wire a bit to expose it. Now fold one wire around the other, fold, and then fold the other on top of it, to create something similar to a chain link.
Now, apply an appropriate ammount of solder.
11.) You must apply heatshrink tubing or electrical tape. This prevents shorts, and, exposed wires are never a good thing. Wrap the tape tightly or fully shrink the tubing.
12.) Now, you will have this:
I like to put the pack on top of the chasiss, but it works equally well if you put it in the bed, cab, or etc. It is your choice. I also bundle the wires with some electrical tape for a cleaner look.
The finished product:
Misc. Notes:Some people like to use differents packs, which is fine. Radioshack offers smaller packs in the electronics bin. Also, you can wire 2 packs (2 AAA each) in a pattern, to split the packs up in unused space on the truck. This is also a good time to add a six cell modification, while you are doing battery wiring work.
Thanks for looking,
Tyler Walker
Admin- Admin
- Posts : 30
Join date : 2008-02-04 -
» Xmods Evolution Car R/C Tutorials
» Generation 1 Tutorials
» Mini-Z Car R/C Tutorials
» Mini-Z Overland R/C Tutorials
» Mini-Z Monster R/C Tutorials
» Generation 1 Tutorials
» Mini-Z Car R/C Tutorials
» Mini-Z Overland R/C Tutorials
» Mini-Z Monster R/C Tutorials
Page 1 of 1
Permissions in this forum:
You cannot reply to topics in this forum|
|
|